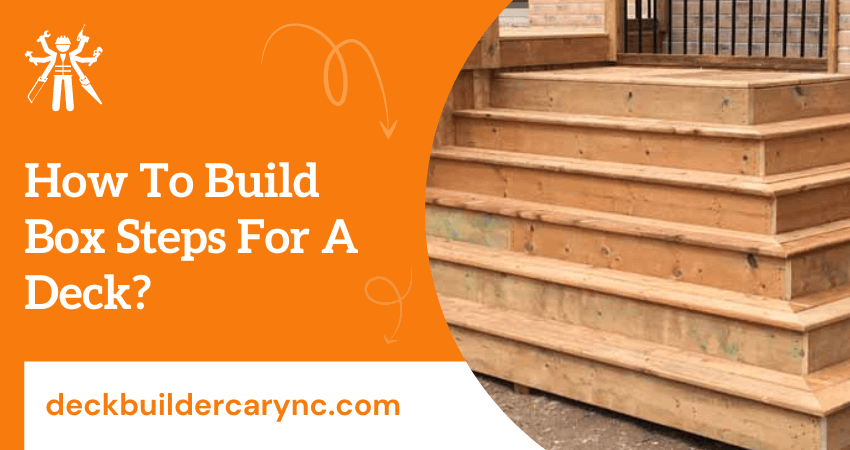
Are you looking to build a set of box steps for your deck? Box steps are an essential element of any outdoor living space, allowing friends and family to come and go smoothly. Whether it’s for getting onto the deck from ground level or providing access between two different levels, building sturdy and stylish box steps can enhance any property.
In this post, we will provide everything you need to know about constructing your box steps and how to make the process as safe, efficient and enjoyable as possible!
Things To Consider While Building Box Steps
List of materials needed for construction
The following are the materials needed for the construction of box steps for the deck:
- Pressure-treated lumber (2×10)
- Pressure-treated plywood
- Galvanized framing nails or screws
- Exterior grade wood glue
- Exterior grade screws
- Framing square
- Circular saw or jigsaw
- Hammer
- Leve
- Tape measure
- Paintbrush and exterior paint (optional)
- Hand saw (optional)
- Deck screws (optional)
- Concrete adhesive and masonry nails (optional)
- Miter saw (optional)
- Power drill/driver (optional)
- Stair treads, risers and nosing strips as per design specifications
It is important to note that the list of materials varies depending on the design and complexity of the project. It is always recommended to consult a local deck builder for advice and guidance.
Furthermore, make sure to check with local building codes before starting the construction process. This will ensure that your project complies with all safety standards.
Tips for selecting the right materials for your specific project
- Consider the available budget: It is important to consider the budget for your project when selecting materials. Some materials can be more expensive than others, so it is important to determine a budget before making any decisions.
- Determine the function of each material: Each type of material has unique characteristics that make it suitable or not suitable for certain applications. Spend time researching the materials available to ensure they will be suitable for the intended use.
- Evaluate the strength and durability of each material: The strength of a material is an essential factor in determining its suitability for a specific project. Be sure to evaluate how strong and durable each material is to make sure it will be able to withstand the forces it will encounter.
- Consider the environmental impact: Certain materials may be better for the environment than others. Be sure to research and consider any potential impacts that using a particular material might have on the environment.
- Think about aesthetics: While function is important, aesthetics should not be overlooked. Consider the appearance of each material to create a product that is pleasing to look at and use.
- Get expert advice: Depending on the complexity of the project, it may be beneficial to seek professional advice when selecting materials. A qualified engineer or designer can provide valuable insight into which materials are best suited for the job.
Following these tips can help ensure that you are selecting the right materials for your project. Making an informed decision upfront can save time, money and effort in the long run.
How to measure the correct size and number of box steps for the deck?
Measuring for the correct size and number of box steps is essential to ensure that your deck stairs are both safe and aesthetically pleasing.
Steps to measure the box steps are as follows:
- Measure the height of your deck to determine how many steps you need and the approximate size of each step.
- Measure the total width of each step, allowing for a 4-inch rise per step—this will help you determine the size of each box step section.
- Measure the total length of each step, taking into account a 6-inch tread depth.
- Use these measurements to determine how many box steps will be needed for your deck stairs.
- Once you have determined the size and number of box steps, purchase or build them accordingly.
- Finally, install the box steps according to the manufacturer’s instructions.
By following these steps, you can ensure that you have the correct size and number of box steps for your deck stairs. This will help make your project look professional and keep it safe for years to come.
Tips for ensuring proper alignment and spacing
- Start with a rectangular frame: When building box steps, it is important to start by constructing a rectangular frame. This will ensure that the steps are properly aligned and spaced.
- Consider the rise and tread depth: The rise of each step should be 4 inches and the tread depth should be 6 inches. This will ensure that each step is safe and comfortable for users.
- Use a level and measuring tape: Using a level and measuring tape can help make sure that the steps are aligned correctly and spaced properly. It is important to measure both horizontally and vertically when installing box steps.
- Allow for some wiggle room: When installing box steps, it is important to leave a small gap between each step. This will ensure that there is plenty of room for movement while using the stairs and also prevent water from pooling on the steps.
By following these tips, you can ensure that your box steps are safe and secure. Proper alignment and spacing are essential to making a functional and attractive staircase.
Step By Step Instructions For Building Box Steps For Deck Construction
- Measure and mark the area where the box steps will be built. Consider both the desired size of the steps and their location within the deck space, making sure they do not obstruct any other primary elements such as railings or stairs.
- Use a circular saw to cut two pressure-treated 2×6 boards to the length of each step. The width of the boards will depend on how wide you want the box steps to be, but should generally be no less than 10 inches for stability.
- Attach the two pressure-treated 2×6 boards at one end using 3″ decking screws and a cordless drill or impact driver. Make sure the boards are flush and level with each other.
- Cut pressure-treated 2×4 boards to create the vertical risers that will hold up the box steps. The length of these boards should be the same as their corresponding step, but the width can vary depending on your desired design.
- Attach the pressure-treated 2×4 boards to the step boards with decking screws, making sure they are flush and level.
- Cut pressure-treated lumber to create the ceiling frame that will house the box steps, using a circular saw or miter saw. The length of each piece should be equal to the overall width of the box steps, plus the thickness of the risers.
- Attach the ceiling frame to the risers using decking screws and a cordless drill or impact driver. Make sure that all pieces are flush and level with each other.
- Attach two pressure-treated 4x4s to the bottom of the box steps, creating a support frame for the box steps. The length of these 4x4s should be equal to the overall width of the box steps.
- Cut pressure-treated 2×6 boards to fit the ceiling frame and attach them with decking screws and a cordless drill or impact driver.
- Cut pressure-treated 1×4 boards to create the skirting board, which will be attached to the outside-of-the-box steps. The length of these boards should be equal to the overall width of the box steps, plus 4 inches for overhang.
- Attach the skirting board to the box steps with decking screws, making sure that all pieces are flush and level.
- Finish your box steps by staining or sealing them with a suitable exterior wood finish product. This will help protect your box steps from weather damage and make them look great!
Follow these steps to build the perfect set of box steps for your deck construction project! With a little bit of planning and some basic tools, you can create beautiful and functional steps that will last you years to come.
Tips for ensuring proper support and stability
- Use pressure-treated lumber for all pieces that will make contact with the ground or concrete. This will help reduce warping and rotting over time.
- Make sure to use adequate fasteners when constructing your box steps – 3” decking screws are typically recommended.
- Construct a support frame underneath your box steps to ensure proper stability.
- Consider adding angled braces at the base of your box steps to further increase their strength and stability.
- When it comes to installation, make sure the box steps are level and square with the ground.
- If you’re going to be painting your box steps, use a waterproof paint or sealant to protect against moisture damage.
- Be sure to regularly inspect your box steps for any signs of deterioration or loosening of fasteners and make repairs as needed.
- If you’re using a pre-made kit for your box steps, follow the manufacturer’s instructions carefully to ensure proper installation and support.
- Always check local building codes before beginning work on any outdoor project, such as box steps, to ensure that you’re following all safety regulations.
- If you need help, consider hiring a professional contractor to ensure your box steps are built safely and securely.
How to attach the box steps to the deck?
- Place the box at the desired location on the deck, making sure that it is level and secure.
- Drill two pilot holes into the back of the box to ensure proper placement.
- Insert screws or bolts through the holes in the box and into the deck, using a power drill or screwdriver.
- Secure the box with nuts and washers, then tighten until secure.
- Fill any gaps between the box and the deck with wood putty or caulk to ensure a watertight seal.
- Apply a coat of waterproof sealant over the box and around it on the deck to protect the box from weather damage.
- Allow the sealant to dry before using the box for storage or other purposes.
Congratulations! You have successfully attached a box to your deck. Keep in mind that you should always check and maintain this new addition periodically as part of your general deck maintenance routine to ensure its longevity.
How to add a handrail for added safety?
Adding a handrail to your home staircase is an easy and affordable way to increase safety. First, you’ll need the appropriate materials for installation. You can purchase pre-fabricated components at most hardware stores or custom-build your rail system using wood and metal components. If going with a pre-made design, it’s important to make sure the components you purchase are designed to fit the specific measurements of your staircase.
Once you have the necessary materials, follow these steps for installation:
i) Measure your stairs
First, measure your stairs and select an appropriate rail post size that fits with each step’s measurements. Depending on your design choice, use lag screws or wood screws to secure the rail posts to the stair stringers. You may also need to drill pilot holes for the screws to fit into.
ii) Add intermediate posts or brackets
Next, add any intermediate posts or brackets between each post, keeping them in line with your measurements. Measure and cut the handrail pieces as necessary and use wood glue to secure them to the posts. Once all of your components are secured, use sandpaper to smooth any rough edges or splinters and finish off with a sealant or paint coat.
When finished, you’ll have an aesthetically pleasing handrail that adds safety and stability while climbing the stairs in your home. With proper installation and maintenance, your handrail can last for years to come!
Tips for maintaining your box steps over time
- Check the outside of your box steps for any wear or damage.
- Make sure to keep nails, screws and bolts tightened. Use a socket wrench to tighten the fasteners if necessary.
- Inspect the treads of your box steps regularly for signs of wear or damage such as cracks, splits, chips and gouges.
- If any section of the steps shows signs of wear or damage, replace it immediately.
- Use a mild detergent and water to regularly clean your box steps to prevent dirt and grime accumulation.
- Make sure to sand off any rough patches on the wood surface before applying a protective finish such as paint or sealer.
- Re-apply a protective finish to the steps every few years, or as needed.
- Check for any loose boards and make sure that they are securely fastened.
- Make sure that your box steps are sturdy and secure before using them.
- Replace broken or worn-out components such as balusters and handrails promptly.
- Use a non-slip material on the steps to prevent slips and falls.
- Regularly check the fasteners connecting the box steps to ensure that they are secure. Replace any worn or damaged parts as needed.
- If your box steps have been exposed to extreme weather conditions, inspect them carefully for signs of damage and repair any affected areas immediately.
- Finally, keep your box steps clear of debris and objects that could cause a tripping hazard. Clean any dirt or debris that accumulates on the steps regularly.
Following these tips will help you to keep your box steps in top condition for years to come.
Conclusion
Building box steps for a deck can be an excellent addition to your backyard. When it comes down to it, the process of constructing them is relatively simple and you don’t need any specialized tools. Being willing to take on this project will ensure that your stairs look great, last long and are safe when you complete the work.
With patience, effort and attention to detail, you can build the best-looking box steps your deck could want. In no time at all, you’ll be sitting back with a beverage and enjoying the view from atop your fresh new project’s completion. Don’t hesitate – to start today on creating amazing outdoor additions for years of enjoyment in just a few easy steps!


